WordPress 2.1 Self-inflicted Problem

I upgraded one of my blogs to WP 2.1 and in the process I ran into an interesting problem. When I tried the insert image button I could not see the insert or cancel buttons at the bottom of the pop up window. When I clicked on X to close the window, it refused to close. This problem only occurred in Firefox 2.0.0.1. It did not occur in Internet Explorer. It also failed when I used Firefox and tried to view the page using the IE tab add-on.

This morning I decided to try the portable version I have of Firefox(2.0.0.1) and it worked. So I went back to my desktop version of Firefox and cleared the cache(Options – Advanced). Now it works.

I think this problem occurred when I tried to delete some directories during the upgrade and I did not notice that they did not go away before proceeding with the rest of the install. When I moved the new directories into place I got a mixture of new and old code rather than a clean install of new code. During my initial testing I noticed some problems and replaced the directories a second time.

I am guessing that an old version of the javascript was still in the cache for my desktop Firefox. The browsers that worked had the correct version.

REMINDER TO MYSELF — Be patient! Rename the existing directories before installing. You can delete the old directories after everything is working.

WordPress Plugins I need to upgrade for WordPress 2.1

I decided to quickly check my plugins for V2.1 compatibility and here is what I found.

  • Akismet Version 1.2.1 should be okay.
  • Feedburner Feed Replacement I have versions 2.1 and WordPress 2.1 needs 2.2 or later.
  • Google Sitemaps I have version 2.7.1 and WordPress 2.1 needs 3.0b5.
  • ImageManager Version 2.3.7 is okay. Updated: I just installed upgraded a site to WP 2.1 and there is no button for Imagemanager. It appears Per has it working but he is still testing the change.
  • Sidebar Widgets Version 1.0.20060711 is okay.
  • WordPress Database Backup I have version 1.7 and WordPress 2.1 needs 1.8 or later. Current version from Il Filosofo is 2.0 and WordPress 2.1 will not include the Database Backup plugin.

From this list I can see I only have to get three updated plugins.

10 Things You should Know About WordPress 2.1 » Technology, Blogging and New Media


Plugin Compatibility – As mentioned above, many plugins will no longer work in 2.1 due to deprecation of database table variables. However, whenever there is a new version of WordPress, the other possible “plugin breaks” extend farther. Fortunately, the WordPress community has been hard at work testing plugins with 2.1 determining compatibility. You can find a list of backwards-compatible plugins at the Codex.

Source: 10 Things You should Know About WordPress 2.1 » Technology, Blogging and New Media

Last week I updated all of my WordPress blogs to 2.0.7 even though I knew 2.1 version was coming soon. There were security issues and Mark’s changed files update  minimized my work on this minor update. As you can see, this update is a bit more complicated since I need to check my plugins first.

Resizing Animated GIFs

Problem: The animated GIF is too large. In my case it was too wide for the sidebar of a blog I was updating.

Solution: Although you can resize the animated GIF using a variety of programs, such as GIMP, and at http://www.gifworks.com/index.php, I found that the highest quality reproduction was made by Photoshop. I used a realtively old version, Photoshop Elements 3.0. After resizing the image, you must tell Photoshop you want to save it as a GIF, check the animate box, and pick a frame delay. The first time I tried it the frame delay was set to 0.2 seconds and the GIF raced through the images.

Keyboard Shortcuts for special characters

Link to Keyboard Shortcuts for special characters

HTML Name Code HTML Number Code Glyph MacOS Windows Description
‘ ‘ option – ] Alt + 0145 left single quote
’ ’ option – shift – ] Alt + 0146 right single quote
‚ ‚ single low-9 quote
“ “ option – [ Alt + 0147 left double quote
” ” option – shift – [ Alt + 0148 right double quote
„ „ option – shift – w double low-9 quote
† † option – t Alt + 0134 dagger
‡ ‡ option – shift – 7 Alt + 0135 double dagger
‰ ‰ option – shift – r Alt + 0137 per mill sign
‹ ‹ option – shift – 3 Alt + 0139 single left-pointing angle quote
› › option – shift – 4 Alt + 0155 single right-pointing angle quote
♠ ? black spade suit
♣ ? black club suit
♥ ? black heart suit
♦ ? black diamond suit
‾ ? overline, = spacing overscore
← ? leftward arrow
↑ ? upward arrow
→ ? rightward arrow
↓ ? downward arrow
™ â„¢ option – 2 Alt + 0153 trademark sign
" " double quotation mark
& & & ampersand
&lt; &#60; < less-than sign
&gt; &#62; > greater-than sign
&#91; [ left square bracket
&#93; ] right square bracket
&ndash; &#150; – option – hyphen Alt + 0150 en dash
&mdash; &#151; — option – shift -hyphen Alt + 0151 em dash
&nbsp; &#160; Alt + 0160 nonbreaking space
&iexcl; &#161; ¡ option – 1 Alt + 0161 inverted exclamation
&cent; &#162; ¢ option – 4 Alt + 0162 cent sign
&pound; &#163; £ option – 3 Alt + 0163 pound sterling
&curren; &#164; ¤ Alt + 0164 general currency sign
&yen; &#165; Â¥ option – y Alt + 0165 yen sign
&brvbar; or &brkbar; &#166; ¦ Alt + 0166 broken vertical bar
&sect; &#167; § option – 6 Alt + 0167 section sign
&uml; or &die; &#168; ¨ option – shift – u Alt + 0168 umlaut
&copy; &#169; © option – g Alt + 0169 copyright
&ordf; &#170; ª option – 9 Alt + 0170 feminine ordinal
&laquo; &#171; « option – \ Alt + 0171 left angle quote
&not; &#172; ¬ option – l Alt + 0172 not sign
&shy; &#173; ­ Alt + 0173 soft hyphen
&reg; &#174; ® option – r Alt + 0174 registered trademark
&macr; or &hibar; &#175; ¯ Alt + 0175 macron accent
&deg; &#176; ° option – shift – 8 Alt + 0176 degree sign
&plusmn; &#177; ± option – shift – = Alt + 0177 plus or minus
&sup2; &#178; ² Alt + 0178 superscript two
&sup3; &#179; ³ Alt + 0179 superscript three
&acute; &#180; ´ option – shift – e Alt + 0180 acute accent
&micro; &#181; µ option – m Alt + 0181 micro sign
&para; &#182; ¶ option – 7 Alt + 0182 paragraph sign
&middot; &#183; · option – shift – 9 Alt + 0183 middle dot
&cedil; &#184; ¸ option – shift – z Alt + 0184 cedilla
&sup1; &#185; ¹ Alt + 0185 superscript one
&ordm; &#186; º option – 0 Alt + 0186 masculine ordinal
&raquo; &#187; » option – shift – \ Alt + 0187 right angle quote
&frac14; &#188; ¼ Alt + 0188 one-fourth
&frac12; &#189; ½ Alt + 0189 one-half
&frac34; &#190; ¾ Alt + 0190 three-fourths
&iquest; &#191; ¿ option – shift – ? Alt + 0191 inverted question mark
&Agrave; &#192; À option – ` A Alt + 0192 uppercase A, grave accent
&Aacute; &#193; Á option – e A Alt + 0193 uppercase A, acute accent
&Acirc; &#194; Â option – i A Alt + 0194 uppercase A, circumflex accent
&Atilde; &#195; Ã option – n A Alt + 0195 uppercase A, tilde
&Auml; &#196; Ä option – u A Alt + 0196 uppercase A, umlaut
&Aring; &#197; Ã… option – shift – a Alt + 0197 uppercase A, ring
&AElig; &#198; Æ option – shift – ’ Alt + 0198 uppercase AE
&Ccedil; &#199; Ç option – shift – c Alt + 0199 uppercase C, cedilla
&Egrave; &#200; È option – ` E Alt + 0200 uppercase E, grave accent
&Eacute; &#201; É option – e E Alt + 0201 uppercase E, acute accent
&Ecirc; &#202; Ê option – i E Alt + 0202 uppercase E, circumflex accent
&Euml; &#203; Ë option – u E Alt + 0203 uppercase E, umlaut
&Igrave; &#204; ÃŒ option – ` I Alt + 0204 uppercase I, grave accent
&Iacute; &#205; Í option – e I Alt + 0205 uppercase I, acute accent
&Icirc; &#206; ÃŽ option – i I Alt + 0206 uppercase I, circumflex accent
&Iuml; &#207; Ï option – u I Alt + 0207 uppercase I, umlaut
&ETH; &#208; Ð Alt + 0208 uppercase Eth, Icelandic
&Ntilde; &#209; Ñ option – n N Alt + 0209 uppercase N, tilde
&Ograve; &#210; Ã’ option – ` O Alt + 0210 uppercase O, grave accent
&Oacute; &#211; Ó option – e O Alt + 0211 uppercase O, acute accent
&Ocirc; &#212; Ô option – i O Alt + 0212 uppercase O, circumflex accent
&Otilde; &#213; Õ option – n O Alt + 0213 uppercase O, tilde
&Ouml; &#214; Ö option – u O Alt + 0214 uppercase O, umlaut
&times; &#215; × Alt + 0215 multiplication sign
&Oslash; &#216; Ø option – shift – o Alt + 0216 uppercase O, slash
&Ugrave; &#217; Ù option – ` U Alt + 0217 uppercase U, grave accent
&Uacute; &#218; Ú option – e U Alt + 0218 uppercase U, acute accent
&Ucirc; &#219; Û option – i U Alt + 0219 uppercase U, circumflex accent
&Uuml; &#220; Ãœ option – u U Alt + 0220 uppercase U, umlaut
&Yacute; &#221; Ý Alt + 0221 uppercase Y, acute accent
&THORN; &#222; Þ Alt + 0222 uppercase THORN, Icelandic
&szlig; &#223; ß option – s Alt + 0223 lowercase sharps, German
&agrave; &#224; à option – ` a Alt + 0224 lowercase a, grave accent
&aacute; &#225; á option – e a Alt + 0225 lowercase a, acute accent
&acirc; &#226; â option – i a Alt + 0226 lowercase a, circumflex accent
&atilde; &#227; ã option – n a Alt + 0227 lowercase a, tilde
&auml; &#228; ä option – u a Alt + 0228 lowercase a, umlaut
&aring; &#229; Ã¥ option – a Alt + 0229 lowercase a, ring
&aelig; &#230; æ option – ’ Alt + 0230 lowercase ae
&ccedil; &#231; ç option – c Alt + 0231 lowercase c, cedilla
&egrave; &#232; è option – ` e Alt + 0232 lowercase e, grave accent
&eacute; &#233; é option – e e Alt + 0233 lowercase e, acute accent
&ecirc; &#234; ê option – i e Alt + 0234 lowercase e, circumflex accent
&euml; &#235; ë option – u e Alt + 0235 lowercase e, umlaut
&igrave; &#236; ì option – ` i Alt + 0236 lowercase i, grave accent
&iacute; &#237; í option – e i Alt + 0237 lowercase i, acute accent
&icirc; &#238; î option – i i Alt + 0238 lowercase i, circumflex accent
&iuml; &#239; ï option – u i Alt + 0239 lowercase i, umlaut
&eth; &#240; ð Alt + 0240 lowercase eth, Icelandic
&ntilde; &#241; ñ option – n n Alt + 0241 lowercase n, tilde
&ograve; &#242; ò option – ` o Alt + 0242 lowercase o, grave accent
&oacute; &#243; ó option – e o Alt + 0243 lowercase o, acute accent
&ocirc; &#244; ô option – i o Alt + 0244 lowercase o, circumflex accent
&otilde; &#245; õ option – n o Alt + 0245 lowercase o, tilde
&ouml; &#246; ö option – u o Alt + 0246 lowercase o, umlaut
&divide; &#247; ÷ Alt + 0247 division sign
&oslash; &#248; ø option – o Alt + 0248 lowercase o, slash
&ugrave; &#249; ù option – ` u Alt + 0249 lowercase u, grave accent
&uacute; &#250; ú option – e u Alt + 0250 lowercase u, acute accent
&ucirc; &#251; û option – i u Alt + 0251 lowercase u, circumflex accent
&uuml; &#252; ü option – u u Alt + 0252 lowercase u, umlaut
&yacute; &#253; ý Alt + 0253 lowercase y, acute accent
&thorn; &#254; þ Alt + 0254 lowercase thorn, Icelandic
&yuml; &#255; ÿ option – u y Alt + 0255 lowercase y, umlaut

New Backup drive for SBS

Buffalo 500g External Hard Drive Buffalo 500g drive station external USB 2.0 SATA hard drive

Source: Micro Center Online BYOPC Specific Product Information

I took advantage of an After Christmas sale and upgraded my backup drive. The Lacie 250 GB drive was a little bit too small. This drive cost me $170 including two rebates. I also picked up a 1GB USB drive. It cost me $9.99 including two rebates. I am planning on putting together a monowall firewall with an old PC I have. The latest beta version of this firewall will boot from an USB drive.

Application publishing: 2X ApplicationServer for Windows Terminal Services


Publish any Windows application onto remote desktops and save on administration & support

With 2X ApplicationServer for Windows Terminal Services companies can reap the benefits of thin client computing without having to switch the network infrastructure to a thin client OS.

Rather than deploying particular windows applications onto all your desktops, resulting in an administration and support nightmare, install the application on one central server and use 2X ApplicationServer for Windows Terminal Services to seamlessly publish the application onto remote desktops.

Users will never know that the application is running remotely and you will be able to manage the application from a single location! Transmitting just the screen updates rather than the client server data is often faster too.

2X ApplicationServer features:

  • Publish applications, rather than installing locally
  • Tunnel an application, not a whole desktop
  • Seamless integration with local desktop & taskbar
  • Publish applications based on username, group membership or IP
  • Publish Windows applications onto Linux   and Mac
  • Publish applications to Web Interface (Windows clients only)
  • Publish applications to a terminal server farm
  • Integration with 2X LoadBalancer
  • SSL secure connection to Applications

Get your FREE 5 application edition of 2X ApplicationServer now! Free perpetual license!

Source: Application publishing: 2X ApplicationServer for Windows Terminal Services

The part that really got my attention was the free 5 user ApplicationServer. A person in one of the newsgroups mentioned that they were using it. I installed the ApplicationServer this week and am testing it with QuickBooks 2004 on an old W2K server. It seems to work fine. Its pricing for a larger numbers of users is pretty decent, too. I was putting together a terminal server quote for a small nonprofit. The have several Win98 computers they are gradually replacing with Win2K vintage computers. The non-profit pricing for the terminal server licenses via Techsoup was pretty low, $50 for the W2K3 server and 5 clients plus $30 for 5 terminal server clients. Combine these licenses with an entry level server and we have a nice manageable application platform that is practically independent of the workstations.

Windows 2003 Terminal Services – What licenses do I need? Examples both with and without SBS 2003.

Last week I gave a licensing seminar before the Northern California Area Quarterly Partner Briefing that ran throughout the morning. In the session we covered many, many aspects of licensing, including “What licenses do you need to use Windows 2003 Terminal Services?” This seems to be an area with several questions, so I thought I would post here about how it really works (and it’s not that bad).

So, if you have a standard Windows 2003 Server network with six (6) PCs connected to it, your network will look like this with the following licenses:

Terminal Services 1(Click to view full size image)

Now what happens if you want to allow two (2) of those PCs to log into the server using Windows 2003 Terminal Services? It’s actually very straight forward… You simply need two (2) Windows 2003 Terminal Services CALs for those two (2) PCs. You can see this represented below:

Terminal Services with 2 CALs(Click to view full size image)

Since you can purchase either User or Device Terminal Services CALs (they are separate items, so purchase the ones you want), the number of Terminal Services CALs you need depends on the total number of Users or Devices (depending on which option you choose to license by) that connect to the server utilizing Terminal Services. These are not concurrent use, so each separate Device or User that utilizes Terminal Services would need their own Terminal Services

Some common questions:

1) Does a Windows 2003 Server include a Windows 2003 Terminal Services CAL

– Answer: No, they are separate items.

2) Does an SBS 2003 Server CAL include a Windows 2003 Terminal Services CAL?

– Answer: No, they are separate items.

3) Does the Windows Desktop Operating System include a Windows 2003 Terminal Services CAL?

– Answer: No, the Windows Desktop Operating System license does not include a Windows 2003 Terminal Services CAL

– NOTE: Customers who had Windows XP Professional licenses prior to April 24, 2003 are eligible to receive a free Windows 2003 Terminal Services CAL for that device. Read the “Terminal Server Licensing Changes and Transition Plan” document for details. These customers have until June 30, 2007 to claim these free Windows 2003 Terminal Services CALs.

So what happens if you’re on an SBS 2003 network and bring up a Windows 2003 Server as a member server on the domain to act as your Terminal Server? Now what? Again, it’s not that bad. Let’s take a look…

So here is how your SBS 2003 Server network would look with a Windows 2003 Server member server:

Terminal Services with SBS(Click to view full size image)

Remember, your SBS 2003 CALs provide you rights to access the Windows 2003 Server as a member server on the network from a server perspective, so you would not need to purchase additional Windows Server 2003 CALs for your Users or Devices. Now, if you want to allow two (2) of those Users or Devices to access the Windows 2003 Server using Terminal Services, then you would need to add two (2) Windows 2003 Terminal Services CALs (one per User or Device depending on which licensing model you choose) to enable those Users or Devices to access the server via Terminal Services:

Terminal Services with SBS(Click to view full size image)

So in reality, the only thing that changes from a network licensing perspective with Terminal Services vs. a regular Windows Server 2003 or SBS 2003 Server environment is the need to add a Windows 2003 Terminal Services CAL for each User or Device (depending on which licensing model you choose) that uses Terminal Services to access the server.

See? That isn’t so bad, is it?

One thing to note, the above talks about the network licensing for Terminal Services. Terminal Services in no way changes Microsoft Office licensing. So, if you have additional PCs access the server via Terminal Services to run Office, you still need one license of Microsoft Office for every device that runs Office and Office is NOT licensed concurrently. Because of this, each device that accesses the Terminal Server to run Office needs its own unique Microsoft Office license and it cannot be an OEM Didn’t know that about OEM Office licenses? Be sure to check out Question #9 on “The 30 in 30” to learn more about that.

Thank you and have a wonderful day,

Eric Ligman

Microsoft US Senior Manager

Small Business Community Engagement

This posting is provided “AS IS” with no warranties, and confers no rights

Link to Windows 2003 Terminal Services – What licenses do I need? Examples both with and without SBS 2003.

Find broken links on your site with Xenu’s Link Sleuth (TM)


Xenu’s Link Sleuth (TM) checks Web sites for broken links. Link verification is done on “normal” links, images, frames, plug-ins, backgrounds, local image maps, style sheets, scripts and java applets. It displays a continously updated list of URLs which you can sort by different criteria. A report can be produced at any time.

Source: Find broken links on your site with Xenu’s Link Sleuth (TM)

I have been playing with this utility over the last couple of days. It does a better job of spidering a website and checking links than anything else I have tried. It said I had a lot of links refering to the SBS Diva’s website that were getting redirected or were wrong. Most of the rest of the link problems had to do with various directory changes I made over the last two years.  There are a couple sites that are no longer posting content.

This utility is great for occasionally verifying that my links. It takes awhile to run. I had to lower the number of threads since I was getting timeouts. Although this utility has a sitemap, I prefer using the WordPress plugin for maintaining the sitemap and pinging Google when I have made a change.

phpWebSite 1.0.0 and XAMPP

I just finished installing phpWebSite on XAMPP . I am a fan of phpWebsite and use it as inexpensive CMS for a couple of web sites. Probably the biggest problem with phpWebSite that I have found is that it is not supported by some web host providers. WordPress on the other hand is supported by most web host providers that I have checked. In some cases WordPress can accomplish the same CMS-like features with less fuss.

For those people who are not familiar with XAMPP, it is an easy way to install an Apache web server, MySQL, PHP and Perl on a windows box. I installed XAMPP when I was tweaking a new theme for WordPress. The installation process was quick and simple. The editing environment was more convenient than a LAMP server on a cheap, local PC or a virtual machine.

There were a few ambiguities to deal with in installing phpWebSite 1.0.0 on XAMPP.  XAMPP installs the latest versions of Apache, PHP, and Mysql. This can cause some problems.

  1. Most people had success if they installed using PHP version 4. What this new version work with PHP version 5. The problems seem to be centered around support for the PEAR libraries.
  2. What are we supposed to do about file and directory security? The phpWebSite installation directions talk a lot about running shell scripts.

After researching XAMPP and phpWebSite I decided to go ahead and follow the instructions provided here. Since the instructions were a little sparse I decided to take notes.

  1. Download phpWebSite 1.0.0 and extract the contents. I placed the contents in a subdirectory called “phpwebsite” under the “htdocs” directory.Create User
  2. Edit the Apache configuration file, “httpd.conf”, and around line 118 remove the # in front of “LoadModule rewrite_module…”. This will turn on the Apache rewrite feature and get rid of the server error message.
  3. Verify the changes by entering http://localhost/phpwebsite/setup/ into your favorite browser. You should get the phpWebSite 1.0.0 – Site Setup screen if everything works correctly.
  4. Before proceeding with the setup you need to create the database and database user. In my case I am going to create a userid and database called phpwebsite. Enter http://localhost/phpmyadmin into your browser and login into phpMyAdmin with your root userid and password.
  5. About the middle of the screen click on the Privileges link. This will take you to the User Overview screen.
  6. Click on the Create New User link. This will take you to the Add a new User screen.
  7. Enter phpwebsite as the username. Use the drop down box to select local for the host. Enter a new password for the user in both boxes. Write down the password if the password is hard to remember. You will need it later. In the box called Database for user, click on radio button to create database with same name and grant all privileges. Now scroll down to the bottom of the page and click on the Go button. If all goes as expected, the database and user are created and you are ready to install phpWebSite.
  8. Enter http://localhost/phpwebsite/setup/ into your favorite browser to get the phpWebSite 1.0.0 – Site Setup screen. At the end of the text click on Begin Installation link.
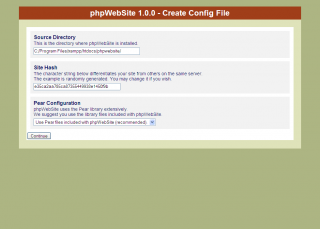
  9. You should now see the Create Config File screen. I accepted the default values and clicked on the Continue button.
  10. Default Create Config FileOn the next screen you will need to make sure that phpwebsite is entered in the box for Database Name and Database User. You will need to enter the User’s password you created above into the Database password box. The Host Specification should be localhost and the other boxes can be blank. Click on the Continue button to go to the next screen.
  11. The installation process should begin and it will present you with a series of screens showing the log file of the installation process. At the bottom of the screen there is a Continue Installation link you need to click on to go to the next screen. Eventually it will ask you to create a phpWebSite user. Otherwise I kept clicking on the link until the installation was complete.
  12. I went to website page and it worked. Evidently I can install and run phpWebSite with PHP version 5. I logged in using the phpWebSite user and password I just created.
  13. My next step was to download new Core and Boost modules from the phpWebSite. Here is the link, http://phpwebsite.appstate.edu/blog/1215. I expanded these files onto my Desktop and then copied the files over the existing phpWebSite files. Finally I went back to my browser and updated the Core and Boost modules using Boost. Next I checked the versions of all of the core modules by clicking on the Check all link at the bottom of the page. I downloaded the new module versions, extracted them onto my desktop, copied them over the original files, and updated them using boost.
  14. Next I installed all of the Other modules. You can be more selective and only install the modules you want but I installed all of them. Then I check their status and updated them the same way I updated the Core and Boost modules.
  15. At this point you can start installing third party modules. I installed the Wiki module since I have one site that use it.
  16. The phpWebSite portion of the installation is essentially complete. However, the site is not ready to use. I still need to do major surgery on my old themes and convert the data.

So here is where I will stop. Converting the themes and data will require some thinking and planning. There have been some significant changes in this version so the changes required are not obvious. I hope this post has helped you.

SBS Diva: The new email retention rules – getting to the bottom of the facts

Seeing this post reminds me of something I’ve noticed lately…. that when it comes to dealing with something mandated by the Government, I’m having to go back to the underlying documents to make my own interpretation of what is really needed for my organization.

Kai talks about the issues but let me bring them up a bit more forcefully…. while these rules DO indeed affect every business, the impact is when you are involved in a federal court case.

….and the last time you and I was involved in such a court case was…..?

….yup… you got it. As long as in the normal course of your business you routinely make backups over the top of the same data, routinely delete emails, routinely… etc etc….. there are no issues whatsoever and no changes you need to make. ONCE you are involved in a federal court case, that’s when you need to reevaluate your process. But for now, it’s business as usual.

My favorite quote was this one… “Under the new rules, an information technology employee who routinely copies over a backup computer tape could be committing “virtual shredding” once a lawsuit has been filed,” said Alvin F. Lindsay, a partner at Hogan & Hartson LLP and expert on technology and litigation.”

This is probably the best rebuttal to that statement I’ve seen: http://www.localtechwire.com/article.cfm?u=15705

“On the other hand, absent exceptional circumstances, there are no sanctions available for the loss of ESI as the result of the “routine, good-faith operation of an electronic information system.”

This exception focuses on the fact that part of normal computer operations are the alteration and deletion of information. The Notes indicated that many steps essential to computer operations may alter or destroy information for reasons wholly unrelated to the litigation. It is recognized that the routine operation includes alteration and overwriting of information, often without the operator’s specific instructions—meaning that there is no direct counterpart in hard-copy documents.

Examples of routine practices that could be considered to come within the scope of the rule are: (1) programs the recycle storage media kept for brief periods against the possibility of disaster that broadly affects computer operations; (2) programs that change metadata to reflect the latest access to electronically stored information; (3) programs that automatically discard information that has not been accessed within a defined period; and (4) database programs that automatically manipulate information without user input.”

Bottom line.. get the facts.. and don’t panic
http://www.law.cornell.edu/rules/frcp/
http://cyber.law.harvard.edu/digitaldiscovery/digdisc_library_4.html

Share this post: email it! | bookmark it! | digg it! | live it!

Link to The new email retention rules – getting to the bottom of the facts

This is a good resource on the legal aspects of “computer maintenance” that explores the shared areas between email retention and routine computer maintenance. Both quotes are correct in their own context and highlight the subtlety of discovery rules. The problem is not with the initial request for electronically stored information(ESI) but if the judge agrees that a second broader request is necessary. This request is typically broader in scope and may involve obsolete hardware and software. The link from localtechwire is the best resource of the three links because if explains how the discovery rules are typically interpreted by judges. I stored an Acrobat version of the localwire article for my reading file.

Nationwide Insurance swaps servers for virtualized mainframes

The Columbus, Ohio-based insurance giant had more than 5,000 servers, and 78% of those servers were seeing a peak utilization of less than 50%.

Considering the number of servers it is surprising that someone did not push a virtualization project through earlier.

Woeckener said the company has reduced its Web hosting costs by 50%, hardware and operating system support costs by 50% and data center floor space demands by 80%.

Source: Nationwide Insurance swaps servers for virtualized mainframes

Problems importing IIF transactions into QB2004

A while back I wrote a post called, “Update to Excel Macro to import IIF transactions“. In it I talked about a macro I was working on to import IIF transactions into QuickBooks. I had intended to share the macro once I got finished testing it. Well, I have finished testing it. There is good news and bad news. The good news is that the macro works as intended. The bad news is that although the transactions will import into QuickBooks, QB2004 does something funny with the transactions and I have not figured why. As an example if I import a late fee invoice, the late fee does not show up on the income statement even though I can see and edit the invoice. If I delete the line on the invoice and re-enter the line, the income will appear on the income statement. Obviously this is not the answer I was looking for.

Since then I have downloaded the SDK and am looking at modifying one of their sample programs to be a import program. With my workload this problem has not been high on my priority list. For whatever its worth, here is the macro as a text file.

Create IIF Rows from selection

Inheriting color

Since I have been playing with CSS problems I decided to try validating the CSS to see if I could clear up some of the less obvious problems. The errors were easy to take care of but the fixes for the warnings were harder to figure out. The CSS validator wanted both the foreground and background colors to be specified if either one was specified. After a little research I figured out how to get rid the majority of warnings. I wanted the warnings to go away but I wanted the browser to keep doing things the way it was doing things. I wanted it to inherit the color setting. Lo and behold, that is what they call the default behavior. So if you add a “background-color:inherit” statement in the selector, you are telling the browser that the default behavior for determining the background-color is okay with you. This statement makes the validator happy and the warning goes away.  I am somewhat ambivalent about adding extra statements in the CSS to make validators happy but on the other hand, this is probably a good way to document your color selections .

Digital Reality: Comparing Programming Languages in real life


There are so many programming languages available that it can be very difficult to get to know them all well enough to pick the right one for you. On the other hand most men know what kind of woman appeals to them. So here is a handy guide for many of the popular programming languages that describes what kind of women they would be if programming languages were women.

Source: Digital Reality: Comparing Programming Languages in real life

This article is funnier if you are male and have actually suffered while programming some of these languages.

GreatNews: The Intelligent RSS Reader

Link to GreatNews: The Intelligent RSS Reader

I was prompted to update my version of GreatNews when I started it today. The upgrade went great until I found that the whimsical css files provided by Maty no longer worked properly. I checked the forum and Maty had noticed it, too. Neither Maty or the forum moderator provided a fix. The 2 column design I was using showed a different colored background behind the text. This background overlapped other lines making it difficult to read. The problem I found appears to be related to the display:inline command. After some playing around I finally got everything to work. In my case I added a display:inline on line 78/79 and commented out the line 91/92. The rest of the changes are related to my desire to use a little larger font and fixing the layout issues of the two column design. Here is my diff file.

   1:  31c31
   2:  <     font: x-small Verdana, Helvetica, Arial, Sans-serif;
   3:  ---
   4:  >     font: small Verdana, Helvetica, Arial, Sans-serif;
   5:  78a79
   6:  >     display: inline;
   7:  80c81
   8:  <     width: 48%;
   9:  ---
  10:  >     width: 45%;
  11:  85c86
  12:  <     width: 99%;
  13:  ---
  14:  >     width: 94%;
  15:  91c92
  16:  <     display: inline;
  17:  ---
  18:  >     /*display: inline;*/
  19:  106c107
  20:  <     margin: 20px 0px 8px 14px;
  21:  ---
  22:  >     margin: 20px 0px 8px 0px;

Accessing Windows Or Samba Shares Using AutoFS

Accessing Windows Or Samba Shares Using AutoFS

You already installed Linux on your networked desktop PC and now you want to work with files stored on some other PCs in your network. This is where autofs comes into play. This tutorial shows how to configure autofs to use CIFS to access Windows or Samba shares from Linux Desktop PCs. It also includes a tailored configuration file.

Link to Accessing Windows Or Samba Shares Using AutoFS

Site Explorer APIs from Yahoo! Search Web Services

Introducing the Yahoo! Site Explorer APIs

Gain a unique perspective on your online presence with Site Explorer APIs

Yahoo! Site Explorer APIs provide access to information about your site from the Yahoo! Site Explorer service. These APIs help you better understand your traffic and usage — querying for the pages in the Yahoo! index and the sites linking into a site. They will be useful to anyone looking for a good grasp of who is linking to you and to create an effective alternative to easily-spammed trackbacks.

Source: Site Explorer APIs from Yahoo! Search Web Services

After creating a sitemap I decided to explore the SEO features available from Yahoo since I got the impression that Yahoo supports the sitemap protocol. Lo and behold, the rumors are true and Yahoo looks like they are happy to use the same sitemap.xml that Google uses. The sitemap support for MSN is under development.

Google Sitemap Generator for WordPress v2 Final


This plugin generates a XML-Sitemap compliant sitemap of your WordPress blog. This format is supported by Google, YAHOO and MSN Search.

More information what XML-Sitemaps are and how they can help you to get indexed by the major search engines can be found at Sitemaps.org and the searchenginewatch blog.

If you have questions about XML-Sitemaps or run into problems, have a look at my Google Sitemaps FAQ.

Source: Google Sitemap Generator for WordPress v2 Final

I just got finished setting this plugin up on three web sites. Google has been very good to the sites that I manage but I decided to see if I could help Google do a better job by using a sitemap. The key to making Sitemap really useful to Google is to dynamically create a new sitemap every time there is a change to the website and to tell Google that the sitemap has been updated.That is where this plugin comes in.

Two sites were plain WordPress blogs and the third site is a business site with a WordPress blog. The first thing I did was:

  1. Create a Google Account
  2. Add my sites
  3. Verify my sites

The next thing was to create a Sitemap. So I uploaded the Google Sitemap Generator plugin to the plugins directory and activated it. Then I went to the Options page for the Sitemap generator. For the two sites that are only WordPress blogs I accepted the default setup. For the business site with WordPress I needed to make a few changes. I changed the location for the sitemap.xml to put it in the root directory. Then I added the pages that are not part of WordPress before clicking on the Update Options button. Finally I clicked on the Rescan button. All of my scans completed without problems so I went back to my Google account and told it where to find my sitemaps. In about five minutes Google had analyzed my sitemaps.

After Google analyzes your sitemaps you can use its statistics pages. The data presented on the Google pages complement the data available via web statistics programs like Awstats. It will probably take me a week or two to figure out how much this helps or hinders my web sites.

Get Ready For Launch

It looks like Eric has been busy trying to encourage the partners to get ready for the Vista, Office 2007, and Exchange 2007 launches. I need to review these but I do not have time right now.